 |
||||||
 |
||||||
 |
||||||
 |
||||||
|
Nail Down Installation Lay out seven or eight rows of flooring end to end in a staggered pattern with end joints at least 6" apart. Find or cut pieces to
fit within 1/2" of the end wall. Watch your pattern for even distribution of long and short pieces and to avoid clusters of short boards.
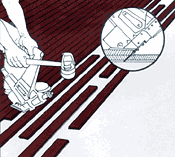
Step 5: Nailing the floor With plywood on slab construction the face nails should be cut to slightly less than 1 1/2". After the starter run fit each run of successive strips snug, groove-to-tongue. Blind nail through the tongue along the length of the strip according to the schedule shown in the nailing schedule table. Countersink all nails. After the second or third run is in place you can change from a hammer to a floor nailing machine which drives nails mechanically or pneumatically, and does not require additional countersinking. Various floor nailing machines use either a barbed cleat or staples, fed into the machine in clips. The nailing machine drives fasteners through the tongue of the flooring at the proper angle. When using the floor nailing machine to fasten 3/4" thick strip or plank flooring to plywood laid on a slab, be sure to use a 1 1/2" cleat, not the usual 2" cleat which may come out the back of the plywood and prevent nails from countersinking properly and tearing the vapor retarder. In all other applications the 2" cleat is preferred. Continue installing across the room, ending up on the far wall with the same 3/4" expansion space as on the beginning wall. It may be necessary to rip a strip to fit. Avoid nailing into a subfloor joint. Position flooring strips so that they do not meet over subfloor joints. Blind nail by hand where the nailing machine can not be used. Face nail the last runs when unable to blind nail by hand. With 2 1/4" strip face-nailing is required the last 2 or 3 runs and in a ripped piece of a strip if one has been used. Use an offset pry bar or lever device to tighten these last face nailed runs all at once before face-nailing. Step 6: Nailing to screeds When nailing direct to screeds (no solid subfloor), nail at all screed intersections and to both screeds where a strip passes over a lapped screed joint. Since flooring ends are tongue and grooved, all end joints do not need to meet over screeds but end joints of adjacent rows should not break over the same void between screeds. Some boards may not be straight. A large screwdriver, sharpened pry bar, or wedges can force such boards into position or pull two or three runs together. Shoe molding. Nail this to the baseboard, not the flooring, after the entire floor is in place. * Always follow manufactures directions |
|||||
Nail Down Installation Part 1 |
|||||
